

3D printing Wolf Key chain
- Mohamed Khaled

- Sep 27, 2018
- 2 min read
Updated: Oct 11, 2018
This task is to print a design you want on Ultimaker, the aim of it is to make you familiar with the Cura and the Ultimaker printer, you get the design you want from the internet or you do it yourself on an Auto CAD, then open it on the Cura and generate the gcode file.


How to prepare your file?
1. First we opened Cura.

2. Then we opened the design we chose, click File, then Open File(s), then chose your design file (.stl), then click Open.

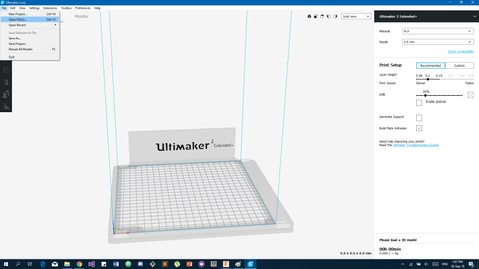


3. Now after importing your design to the Cura, we will chose the printer and the material.


4. Now you can change the Nozzle width, the Layer Height and the Infill percentage.

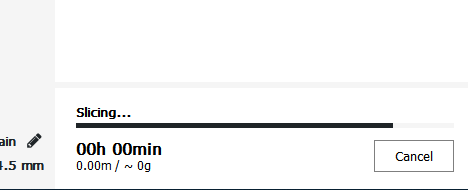
5. Now after changing the Print Setup as you like you will click Prepare to get you design sliced to be ready to print, it will give you the Time it will take and the result Weight.
6. you can change the viewing to Layer View to see the printing result simulation and the layers, you can move the height of the layers to see the details, the colors will represent Shell Layer, Infill, Inner wall, Travels, and helpers.


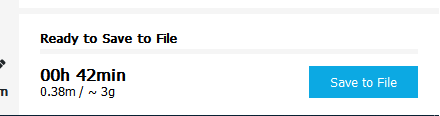
7. by clicking Layer view this is what will be printed to you as the result so you can change it if you want to see more details or to reduce the quality to print faster, if yo won't change the result click Save to File to save your design in .gcode file to be printed.

Now after saving your file in .gcode you copy it into the SD card of the printer to put it in the printer to print.
How to print your design on Ultimaker 2 Extended plus?1. first you will have to have your design in a .gcode file format.2. then copy it to the SD card of the printer.


3. After putting it on the card insert the card in the printer, then click on print, then move the button around to go up and down to find you design name then click it and it will be automatically start.


This video shows how to Find and Print your design:
Then now you wait for the printer to print:
1. First the Nozzel start heating.
2. When the Nozzel is heated it will start the print the prime.


3. After that it will start printing your Design.
4. The printer will give you the time left to the print is finished.


5. After it finish the design you leave it till tit cool down and it will tell you that the design is ready and remove it.


The result:


Link: https://drive.google.com/open?id=10828lB70i1QNiDrLU4yf6xm0kX3TnSE9


Comments